It sure looks like $200 is that magic number for me. That’s the number that seems to make it worth building something for someone else. But why that number? Well.. Usually it’s not the cost of the materials that dictate the cost of something, it’s how much of a pain in the ass it is. So why does the Tamasudare cost $200? Here is why…
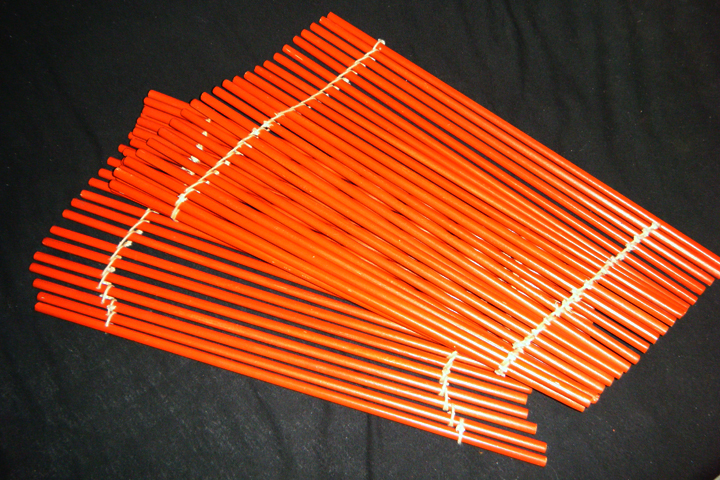
First, there are 56 sticks in a tamasudare. Each stick is 16 inches, and 5/16 of an inch in diameter. So the first stop is to the hardware store to pick up some dowel rods. They come a yard long, that’s 3 feet for those who don’t know. That means you are going to get two sticks out of one dowel and have a lot of paint stirrers left over. So you will need at least 28 dowels, but you better get at least 30.
You might as well have a seat on the concrete floor and get comfortable. You are not just going to grab 30 sticks and walk away. No, most of them are crooked as a corkscrew. Most look like Harry Potter wands. No, the best thing to do is to pull every one of them out of the bin and lay them on the ground. Go through each one, eyeing down the stick to see how straight it is. Go through them all and pick out the straight ones. You won’t have enough. So you will need to go through them again and pull the ones out that you can cut a straight piece out of. Then you should have enough. If not, you have to go to another store.
Once back to the shop, it’s time to start cutting. Now of course for a skilled craftsmen, this is no big deal, but to an amateur, good luck. Once they are all cut, it’s time to go through them and pull off that stupid sticker they have to put on every dowel. That’s right, half of your sticks are going to have a stupid sticker on them that you are going to have to use some chemical to get off. I hate those things!
Now it’s time to drill some holes. Each stick needs a hole at each end exactly the same distance from the end, and both holes must be parallel to each other. This will take a pretty clever jig to get perfect. This is where skill in woodworking really comes in to play. Holes in dowels that are parallel to each other is harder than you may think. I did come up with a clever jig to keep them straight. So I can bust them out pretty fast, but only thanks to my expertise.
Now that you have the sticks formed, it’s time to finish them. “Finish” as in a paint finish or a stain finish, or whatever finish you want. They have to be finished in some way. They also have to be perfect. This is a device where sticks slide back and forth through strings. They have to be smooth as a babies butt. Which means it’s time to start sanding. Sanding 56 sticks. They have to be smooth.
Once they are sanded, you can paint them. Seems easy huh? Wrong! How are you going to do it? Spray it? Brush it? Wipe it? It has to be smooth. If you want it color, you will need to spray it, but how? Lay a dowel rod on the table and spray it. Then watch it shoot across the table like blowing on a straw. Hang it up? There are holes, but then they start swaying, and remember, you have 56 of them. Also, you’re spraying a broad cone of paint onto a narrow thin piece of wood. The majority of paint is not even hitting the stick. That’s a waste of paint. So you have to get the sticks close together so that the paint isn’t wasted, but you have to keep them from touching. Another jig is needed to hold them while painting. You can solve the problems, but it’s still very time consuming.
Now that they are painted, you would think you are ready to put it together… but no. Paint, stain, clear coat, or whatever you put on those sticks is going to “pop the grain”. That means the fibers of the wood are going to swell, contract, move, all while the finish is drying. It makes the sticks rough as a cob again. So now you have to go back and sand them again. You have to get finer and finer too. All the way down to steel wool. Now you can paint them again and hopefully you won’t have to sand them again, but you may. Fun fun.
Once you finally get the sticks finished, it’s time to put it together. Each stick has to be tied to next one… individually. That means over 100 knots have to be made. Each stick will need a piece of string through their holes. You better just get comfortable, because you are going to be doing this for a few hours. This is very very time consuming. There is also a certain way you have to do it, or you will make it even harder on yourself. 110 knots… 110 tiny knots!
Once you have tied all those knots, you need to put some glue on them or they will come unravelled. Then trim them all up and finally you will have one made. So as you can see, why does a Tamasudare cost $200? Because it is a pain in the ass to make, but oh how cool they are!! Is it worth it? For $200 they are.
Get yours here…
Tamasudare Magic Mat by Randi Rain